共计 5926 个字符,预计需要花费 15 分钟才能阅读完成。
1. 安装 Prometheus Server
1.1 运行用户创建
groupadd prometheus
useradd -g prometheus -m -d /opt/prometheus/ -s /sbin/nologin prometheus
1.2 prometheus server安装
wget https://github.com/prometheus/prometheus/releases/download/v2.25.2/prometheus-2.25.2.linux-amd64.tar.gz
tar xzf prometheus-2.25.2.linux-amd64.tar.gz -C /opt/
cd /opt/prometheus-2.25.2.linux-amd64
1.3 prometheus配置语法校验
建议每次修改prometheus配置之后, 都进行语法校验, 以免导致 prometheus server无法启动.
./promtool check config prometheus.yml
1.4 启动Prometheus
此时采用默认配置启动 prometheus server 看下界面, 稍后介绍如何监控Linux 服务器.
./prometheus --config.file=prometheus.yml
1.5 通过浏览器访问prometheus
访问地址 ip:9090

发现 target 中只有 prometheus server, 因为我们还没有加入其他监控, 下面进行介绍, 后续博文中还将陆续介绍如何监控 redis, RabbitMQ, Kafka, nginx, java等常见服务.

prometheus默认配置:
# my global config
global:
  scrape_interval:     15s # Set the scrape interval to every 15 seconds. Default is every 1 minute.
  evaluation_interval: 15s # Evaluate rules every 15 seconds. The default is every 1 minute.
  # scrape_timeout is set to the global default (10s).

# Alertmanager configuration
alerting:
  alertmanagers:
  - static_configs:
    - targets:
      # - alertmanager:9093

# Load rules once and periodically evaluate them according to the global 'evaluation_interval'.
rule_files:
  # - "first_rules.yml"
  # - "second_rules.yml"

# A scrape configuration containing exactly one endpoint to scrape:
# Here it's Prometheus itself.
scrape_configs:
  # The job name is added as a label `job=<job_name>` to any timeseries scraped from this config.
  - job_name: 'prometheus'
    scrape_interval: 10s
    static_configs:
    - targets: ['localhost:9090']
1.6 设置prometheus系统服务,并配置开机启动
touch /usr/lib/systemd/system/prometheus.service
chown prometheus:prometheus /usr/lib/systemd/system/prometheus.service
vi /usr/lib/systemd/system/prometheus.service
将如下配置写入prometheus.servie
[Unit]
Description=Prometheus
Documentation=https://prometheus.io/
After=network.target

[Service]
Type=simple
User=prometheus
# --storage.tsdb.path是可选项,/opt/prometheus/为存放执行文件目录,请根据自己实际地址填写,默认数据目录在运行目录的./dada目录中
ExecStart=/opt/prometheus/prometheus --config.file=/opt/prometheus/prometheus.yml --web.enable-lifecycle --storage.tsdb.path=/opt/prometheus/data --storage.tsdb.retention=60d
Restart=on-failure

[Install]
WantedBy=multi-user.target
Prometheus启动参数说明
- --config.file -- 指明prometheus的配置文件路径
- --web.enable-lifecycle -- 指明prometheus配置更改后可以进行热加载
- --storage.tsdb.path -- 指明监控数据存储路径
- --storage.tsdb.retention --指明数据保留时间
设置开机启动
systemctl daemon-reload
systemctl enable prometheus.service
systemctl status prometheus.service
systemctl restart prometheus.service
说明: prometheus在2.0之后默认的热加载配置没有开启, 配置修改后, 需要重启prometheus server才能生效, 这对于生产环境的监控是不可容忍的, 所以我们需要开启prometheus server的配置热加载功能.
在启动prometheus时加上参数 web.enable-lifecycle , 可以启用配置的热加载, 配置修改后, 热加载配置:
curl -X POST http://localhost:9090/-/reload
2. Prometheus 配置监控其他Linux主机(以下操作在其他Linux机器上面执行)
2.1 node_exporter安装配置
# 运行用户添加
groupadd prometheus
# /usr/local/node_exporter/ 为准备存放监控文件的路径
useradd -g prometheus -m -d /usr/local/node_exporter/ -s /sbin/nologin prometheus
# 前往 https://prometheus.io/download/#node_exporter 下载node_server
wget https://github.com/prometheus/node_exporter/releases/download/v1.1.2/node_exporter-1.1.2.linux-amd64.tar.gz
# 解压到指定目录并删除下载文件
tar -zxf node_exporter-1.1.2.linux-amd64.tar.gz
mv node_exporter-1.1.2.linux-amd64 /usr/local/
ln -sv /usr/local/node_exporter-1.1.2.linux-amd64 /usr/local/node_exporter
rm -f node_exporter-1.1.2.linux-amd64.tar.gz
# 系统服务配置 node_exporter
touch /usr/lib/systemd/system/node_exporter.service
chown prometheus:prometheus /usr/lib/systemd/system/node_exporter.service
chown -R prometheus:prometheus /usr/local/node_exporter*
vi /usr/lib/systemd/system/node_exporter.service在node_exporter.service中加入如下代码:
[Unit]
Description=node_exporter
After=network.target
[Service]
Type=simple
User=prometheus
# /usr/local/node_exporter/node_exporter 为执行文件路径,请自行修改
ExecStart=/usr/local/node_exporter/node_exporter
Restart=on-failure
[Install]
WantedBy=multi-user.target
启动 node_exporter 服务并设置开机启动
systemctl daemon-reload
systemctl enable node_exporter.service
systemctl start node_exporter.service
systemctl status node_exporter.service
systemctl restart node_exporter.service
systemctl start node_exporter.service
systemctl stop node_exporter.service
node_exporter启动成功后, 你就可以通过如下api看到你的监控数据了(将下面的node_exporter_server_ip替换成你的node_exporter的IP地址, 放到浏览器中访问就可以了 ).
http://node_exporter_server_ip:9100/metrics为了更好的展示, 接下来我们将这个api 配置到 prometheus server中, 并通过grafana进行展示.
将 node_exporter 加入 prometheus.yml配置中 ,完整的prometheus.yml文件如下
# my global config
global:
  scrape_interval:     15s # Set the scrape interval to every 15 seconds. Default is every 1 minute.
  evaluation_interval: 15s # Evaluate rules every 15 seconds. The default is every 1 minute.
  # scrape_timeout is set to the global default (10s).

# Alertmanager configuration
alerting:
  alertmanagers:
  - static_configs:
    - targets:
      # - alertmanager:9093

# Load rules once and periodically evaluate them according to the global 'evaluation_interval'.
rule_files:
  # - "first_rules.yml"
  # - "second_rules.yml"

# A scrape configuration containing exactly one endpoint to scrape:
# Here it's Prometheus itself.
scrape_configs:
  # The job name is added as a label `job=<job_name>` to any timeseries scraped from this config.
  - job_name: 'prometheus'

    # metrics_path defaults to '/metrics'
    # scheme defaults to 'http'.

    static_configs:
    - targets: ['localhost:9090']
# 下面内容为新增 ,yml文件存放地址请自行修改
  - job_name: 'Linux'
    file_sd_configs:
    - files: ['/opt/prometheus/linux.yml']
      refresh_interval: 5s
并在文件/opt/prometheus/linux.yml中写入如下内容
- targets: ['192.168.64.202:9100']
      labels:
        name: 'linux-node01'
如果你按照上面的方式配置了, 但是使用工具 promtool检测prometheus配置时,没有通过, 那肯定是你写的语法有问题, 不符合yml格式. 请仔细检查下. 如有疑问, 可以在下方评论区留言.
这样做的好处是, 方便以后配置监控自动化, 规范化, 将每一类的监控放到自己的配置文件中, 方便维护.
#配置语法校验./promtool check config prometheus.yml# 重载prometheus配置curl -X POST http://localhost:9090/-/reload

3 数据展示Grafana安装配置(主机器)
下载地址: https://grafana.com/grafana/download
wget https://dl.grafana.com/oss/release/grafana-7.4.5-1.x86_64.rpm
sudo yum install grafana-7.4.5-1.x86_64.rpm
granafa默认端口为3000,可以在浏览器中输入http://localhost:3000/
granafa首次登录账户名和密码admin/admin,可以修改
如果发现访问不了,请手动执行启动服务命令
# 启动
systemctl start grafana-server
# 加入开机启动
systemctl enable grafana-server
# 查看服务启动状态
systemctl status grafana-server
配置数据源
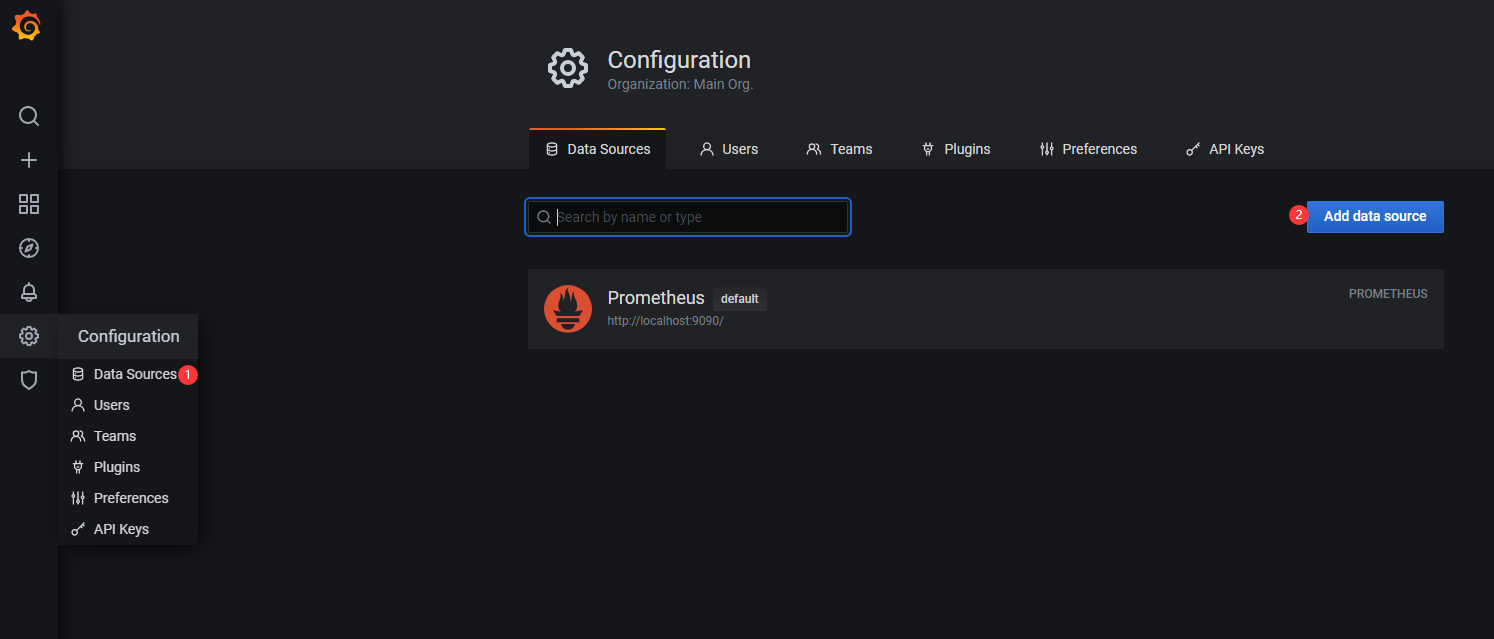
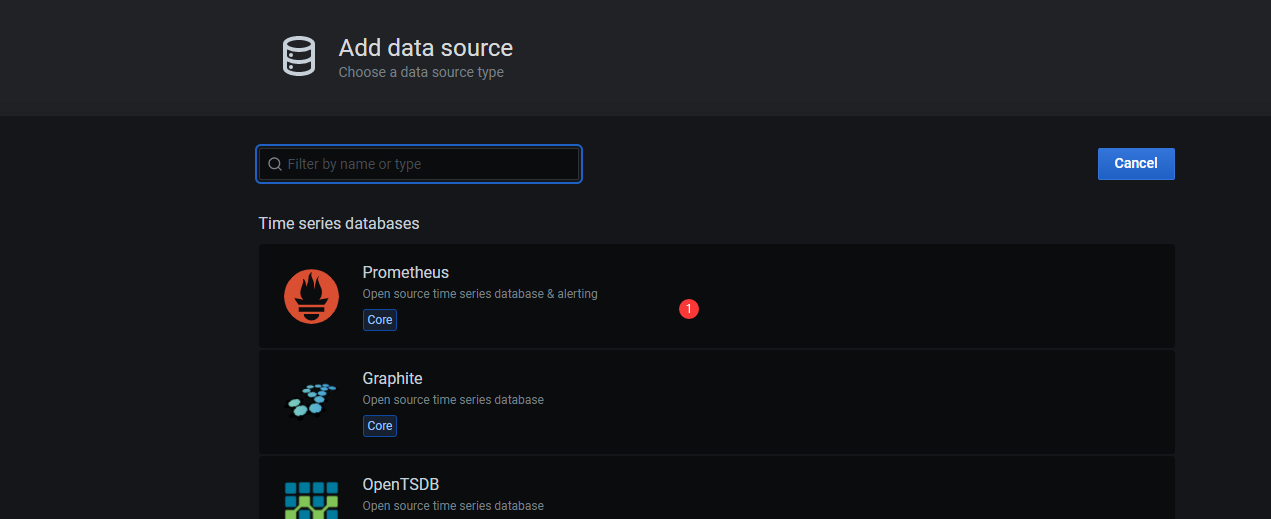
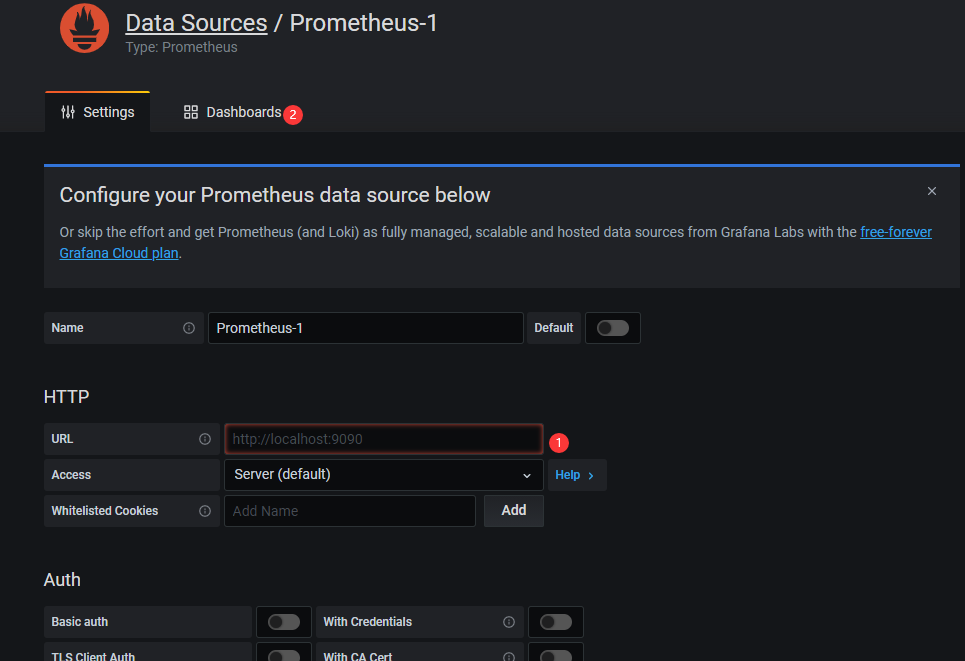
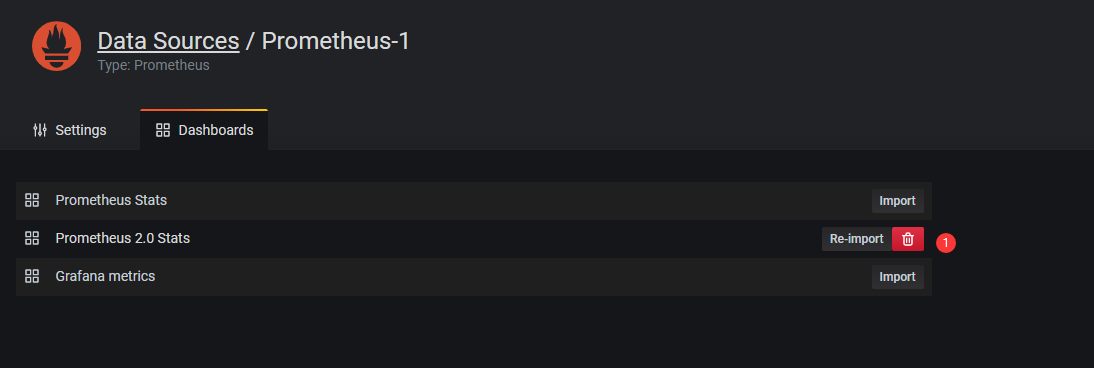
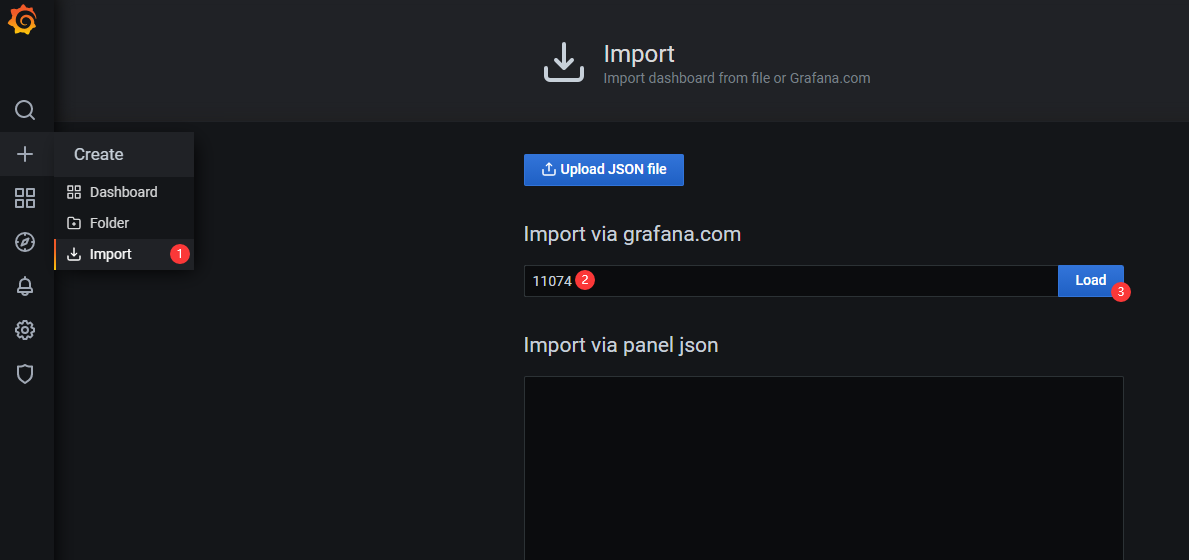
新增其他Linux机器
只需要安装 安装 node_exporter 方法重复执行即可
注意 /opt/prometheus/linux.yml 文件新增内容
- targets: ['192.168.64.202:9100']
      labels:
        name: 'linux-node01'
# 新加入的机器
    - targets: ['192.168.64.203:9100']
      labels:
        name: 'linux-node02'


